Quick Links:
- Home Page
- Game Parts & Supplies
- Game Service & Repair
- Games for Sale
- Ordering Info
- Technical Articles
- Contact Us
|
|
 |
Data East, Sega, & new Stern Games
(~1990-2014) |
NOTE: These instructions assume your game has been packaged for shipment as shown in images below. This information is intended to help you set up your pinball machine after it has been shipped to you from our shop. Use this information at your own risk. We (Action Pinball) are not responsible for any damage to you, your location, or your game, that may result from following, or not following the instructions below.
Materials Needed:
- One or two friends to help.
- Scissors or knife.
- 5/8" or 9/16" open-end wrench, or socket wrench.
- Backbox allen-wrench (included with game).
 Click on any image below for a larger view. Click on any image below for a larger view.
 |
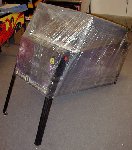
Step 1: UnpackingUnpack your game to the extent shown in the image to the left. Backbox should still be secured to the main cabinet with stretch-wrap or a strap (as shown in image).
USE CAUTION when cutting away any cardboard or stretch-wrap from the game, so as not to cut through the packaging and damage the cabinet surface! Patience and neatness count in this process.
Locate the hardware (bolts, balls, keys, etc) that are packed with the game, and set aside for use during assembly. With backbox still secured to main cabinet (in its "down" position), position the game so that it is sitting on it's back end, coin door facing up, as shown in image. |
 |
Step 2: Attach Front Legs
Locate the front legs. These are the legs with the leg levelers (feet) that are screwed all the way in. (Back legs will have the leg levelers screwed OUT an inch or two- so that the game sits higher in the back, than in the front). If your game was packaged in a factory carton, the legs may be packed in the cardboard packing that goes in the corners of the box.
Locate the leg bolts (8 pieces) and leg protector pads (4 pieces) that were shipped with the parts & accessories for your game.
Each leg will use 2 bolts. Insert the two bolts through the holes in the leg. Then slip the leg protector pad over the bolts. Then insert the leg assembly into the 2 bolt holes on the corner of the cabinet.
Special Note: If your game has three mounting holes for the two leg bolts (some games do, for different mounting/positioning), you will usually mount the legs in the lower two holes, rather than the upper two holes- this should make the game sit at normal height. Mounting legs in the upper holes is optional, but will usually make the game sit lower to the ground.
IMPORTANT NOTE ON INSTALLING LEG BOLTS: Do not let the weight of the machine rest on the leg & leg bolts as you are installing/tightening the bolts. This can cause the leg bolts and leg mounting plate inside the game to be mis-aligned, and will cause the bolts and plate to strip-out or sieze, resulting in damage to the game and possible costly repair. Always support the weight of the game, and the leg itself, separately, while you are installing the bolts. The bolts should turn freely by hand as you are installing them. Do not force leg bolts.
Depending on the manufacturer of your game, the leg bolts will require either a 5/8", or a 9/16" wrench to tighten them. Tighten the bolts so that they are snug but do not overtighten- we recommend "wrist tight", which is a tight as you can comfortably turn a wrench using only your wrist. Legs to not need to be overtightened- it is easy to strip the bolts or threads inside the cabinet that hold the bolts, which can require costly repair.
The leg levelers on the front legs of your game should always remain in all the way (so the legs sit as close to the floor as possible). They can be adjusted up/down slightly to level the game on an uneven floor surface, but should generally be left all the way in. Adjusting the levelers out will raise the front of the game, and change the angle of the game and the playfield (making game play slower) which generally isn't necessary to do from the front- such adjustments should be made with the back leg levelers only.
|
 |
Step 3:Lower the front of the machine to the ground, so that the front is sitting on the legs you just installed. |
 |
Step 4: Attach Back LegsWith one or two helpers, lift the back end of the machine off the floor, and have helpers hold it, or place it's back end on a stool, as shown in image.
Using the remaining four leg bolts, and two leg protector pads, attach the back legs, just as you did the front legs. DO NOT OVER-TIGHTEN!
Remember- the back legs have leg levelers that are screwed out about an inch or so, so that the back end of the game sits higher than the front end.
The leg levelers on the back of the game should never be screwed all the way in (so the game sits as low as possible in the back). This is unnecessary, and will make for unusually slow game play. On Data East, Sega, and Stern games, this can also cause intermittent problems with the ball trough on the playfield- causing balls to hang up or get stuck, or causing the game to kick more than one ball out to the ball plunger when it should not. So always make sure the back of the game is set up correctly with leg levelers screwed out at least an inch or more, for proper game setup, and to avoid any unnecessary problems.
Remove stool- set back of game down on it's legs, on the floor. |
 |
Step 5: Unpack BackboxUsing scissors or a knife, carefully cut away or remove any packing material holding the backbox down (stretch-wrap and/or strap). Be very careful not to cut or scrape/scratch the game when cutting away the packing material. |
 |
Step 6: Raise and Secure BackboxRaise backbox to upright position. Be careful not to smash any cables in-between the backbox and the main cabinet, as you are raising the backbox (have a helper guide any cables/wires through the "neck" of the game, as you are raising the backbox).
Lock the backbox in it's upright position using the included backbox allen-wrench. 1/2 to 3/4 of a turn of the wrench, in the clockwise direction, will lock the backbox in place. |
 |
Step 7: Remove Lockdown BarThe lockdown bar is the metal bar that goes across the front of the game, and holds the playfield glass in place. It's what you rest your hands on when playing the game.
Locate the keys for your game's front door, and unlock & open the coin door. Locate the playfield glass lockdown bar release lever, just inside the upper right corner of the coin door opening.
Pull lever all the way to the LEFT until it stops. This will release the playfield glass lockdown bar.
While holding the lever in the far left position, lift the lockdown bar straight up with your other hand, to remove it from the game, and then set it aside. (You may want a helper to hold the glass in place while you remove the bar.)
|
 |
Step 8: Install Pin BallsLocate pin ball(s). Pull playfield glass down a short distance and place the pin ball(s) on the playfield surface and let them roll down to the outhole. Different games will use a different number of balls- anything from one to six balls, usually. If you are not sure how many balls your game should use, check for a label under the playfield glass lockdown bar which will indicate the number of balls to install, or contact us and we can tell you.
Slide playfield glass back up and replace the lockdown bar. The lockdown bar should have two "tabs" that go into two slots in the bracket at the front of the playfield. You may have to pull the lockdown bar release lever back to the far left position in order to replace the bar- again here, a helper may be handy. Then lock the bar in place by sliding the release lever back to the right position. Lever must go all the way to the right in order for the coin door to close. Close coin door. |
 |
Step 9: Install Tilt Plumb Bob
The tilt plumb bob is located on the inside left wall of the main cabinet- just inside the coin door of your game. It may or may not have already been installed, depending on your particular game. Take a brief moment to check to see if the plumb bob is installed, and to make any necessary adjustments that may or may not be required, depending on how your game is set up (levelness from front-to-back and side-to-side- more info below).
Installation of the tilt plumb bob is optional, but recommended for two reasons: 1) Having the tilt bob installed and working/functional will discourage abuse of the game (which is NOT covered under warranty). 2) Without the bob installed, the tilt mechanism will not work properly, or may be overly-sensitive, causing erratic and intermittent "tilts" during game play. For these two reasons, we recommend installing the tilt plumb bob in your game (and/or keeping it installed).
If you have a new game and tilt plumb bob has not been installed, you should find it located with the game's parts/accessories (may be with parts in a separate box, or included inside the coin box inside front door).
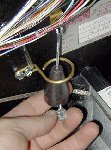
Locate the tilt bob rod and ring inside the cabinet. Slide the bob onto the bottom of the rod until the top of the bob is about level with the brass ring. Then tighten the thumb screw in the bob to secure it to the rod. Do not overtighten the screw- it can strip, or break the plumb bob. Just make sure it is snug enough to hold the bob on the rod.
The bob can be moved up or down the rod, to make the game easier, or harder, to tilt. Higher up is easier to tilt (conservative)- lower down is harder to tilt (liberal). You will notice when you bump the game, the tilt plumb bob will swing from side to side. If bumped too hard, the bob will contact the ring- this constitutes a "tilt".
Lastly, you will want to check to see if the bob is centered in the ring, when it is at rest (not moving). If the game is properly leveled from side-to-side, the bob should sit in the center of the ring (centered from left to right). If the bob sits too far forward or backward in the ring, then the ring can be adjusted to center the bob within it. You can adjust the ring by slightly loosening the two hex-head screws that secure it to the cabinet wall, and moving it back/forth accordingly, then re-tightening the screws.
Changing the levelness of your game from side-to-side, or adjusting the leg levelers on the game from back to front (increasing or decreasing the angle of the playfield, and the whole game) will change the plumb bob's position in relation to the ring, and may require another adjustment if you adjust the angle or levelness, of your game.
|
 |
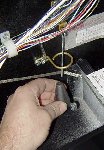
Step 10: Power On!Locate the line cord, which comes out of the back side of the game. It should be pushed into a round, recessed opening on the back side of the game, in the lower left corner, near the back leg.
Gently pull cord out of the hole. If it snags, or won't come out, do not force it. You may need to open the game, raise the playfield, and see if it is snagged on something like the speaker, or an under-playfield part/component. Forcing the cord (pulling too hard) may damage the game.
Plug line cord into a grounded outlet- or better yet- plug into a surge-protected power strip.
Turn game on by the main power switch. This switch is located under the front right corner of the main cabinet (behind front right leg) on the bottom side of the main cabinet (see picture). It is in a recessed hole on the underside of cabinet. Flip switch to the ON position, and verify that the game powers up and score display lights, playfield lights flash, etc. Most games will take about 10 seconds to completely boot up and start, before you will see lights flashing, score display working, and before you can start a game.
|
You are now ready to play!
Most games we ship are pre-set to "free play" setting, so no coins are required for operation. If you want to change your game from "free play" to "coin play", or vice-versa, please see the game operation manual for instructions on how to make these, and other similar adjustments to your game. Or contact us if you need any further info.
Game Levelling: You may need to level the game from side to side, depending on how the leg levelers are set on the legs, or on the evenness, or non-evenness of your floor. You can "eyeball" the game for level from side to side, or use a bubble level, in two positions- across the front of the machine, and across the back of the machine. Adjusting the leg levellers on the legs will allow the game to be properly levelled.
If you notice the ball rolling more to one side than the other during play, you may need to adjust the leg levellers to re-level the game.
Raising the back of the game (by adjusting leg levellers out (or "down"), on the back legs) will make the angle of the playfield steeper, and cause the ball to roll faster, and game play to be more difficult.
Lowering the back of the game (by adjusting leg levellers in (or "up"), on the back legs) will make the angle of the playfield less steep, and cause the ball to roll slower, and game play to be easier.
You may want to get someone to help lift one corner of the game up slightly while you adjust each leg leveller.
Game Keys: Your game will have two keys, or two sets of keys- one for the coin door, and one for the backbox. The keys for the backbox can be stored on a hook on the inside of the coin door- usually mounted on the left or right side of the coin slots.
Keys for the coin door should be kept in a safe place. No one should need to get into the machine for any reason other than for maintenance/service, etc. And high voltage is present inside the game, so best to keep coin door locked and keys in a safe remote place to keep unwanted hands and fingers out of the machine.
Other Information: Consult the game manual that was included with your machine for additional information on game operation, how to raise/lower the playfield, how to open the backbox, how to make adjustments to game settings, options, or volume, etc. And of course, if you have any questions that you cannot find answers for, just call or e-mail us! We'll be happy to help!
If you have any questions, problems, or require any additional information, please contact us.
Back to Top
|

 Game Setup & Assembly Information


